레이블이 #WPF델리게이트인 게시물을 표시합니다. 모든 게시물 표시

2019년 1월 26일 토요일

WPF 데이터바인딩, ListBox와 Linq 쿼리를 이용한 간단한 데이터바인딩, 새창 띄우기, 이벤트 및 델리게이트를 통한 메인 윈도우의 ListBox Refresh 적용 실습

WPF 데이터바인딩, ListBox와 Linq 쿼리를 이용한 간단한 데이터바인딩, 새창 띄우기, 이벤트 및 델리게이트를 통한 메인 윈도우의 ListBox Refresh 적용 실습
n 직무타입(내근:Inner, 외근:OutSide)과 직무목록을 보여주는 두개의 ListBox 컨트롤을 사용해서 직무타입을 선택하면 Linq를 통해 해당 직무타입의 직무를 쿼리해서 하단의 ListBox에 보여주는 예제이다.
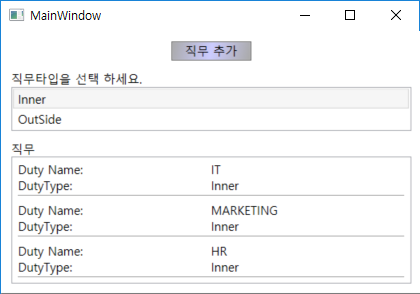
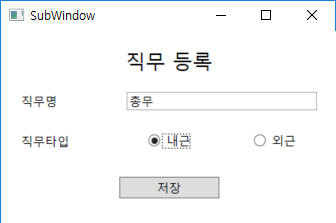
“직무추가” 버튼을 클릭하면 새창이 뜨고 직무를 입력 후 저장 버튼을 클릭하면 직무입력 화면이 사라지고 메인 윈도우 상단의 ListBox가 새창에서 입력한 직무타입으로 선택되면서 하단의 ListBox는 해당 직무타입의 직무목록으로 자동으로 Refresh 된다.
WPF 프로젝트를 생성하자. (본 예제에서는 프로젝트명을 WpfApp1”로 설정했다.)
[Duty.cs]
using System.Collections.ObjectModel;
namespace WpfApp1
{
public enum DutyType
{
Inner,
OutSide
}
public class Duty
{
private string _name;
private DutyType _dutyType;
public Duty()
{
}
public Duty(string name, DutyType dutyType)
{
_name = name;
_dutyType = dutyType;
}
public string DutyName
{
get { return _name; }
set
{
_name = value;
}
}
public DutyType DutyType
{
get { return _dutyType; }
set
{
_dutyType = value;
}
}
}
public class Duties : ObservableCollection<Duty>
{
public Duties()
{
Add(new Duty("SALES",DutyType.OutSide));
Add(new Duty("LOGISTICS", DutyType.OutSide));
Add(new Duty("IT", DutyType.Inner));
Add(new Duty("MARKETING", DutyType.Inner));
Add(new Duty("HR", DutyType.Inner));
Add(new Duty("PROPOTION", DutyType.OutSide));
}
}
}
[MainWindow.xaml]
<Window x:Class="WpfApp1.MainWindow"
xmlns="http://schemas.microsoft.com/winfx/2006/xaml/presentation"
xmlns:x="http://schemas.microsoft.com/winfx/2006/xaml"
xmlns:local="clr-namespace:WpfApp1"
Title="MainWindow"
SizeToContent="WidthAndHeight" Height="600">
<Window.Resources>
<local:Duties x:Key="duties"/>
<DataTemplate x:Key="MyTemplate">
<Border Name="border">
<Grid>
<Grid.RowDefinitions>
<RowDefinition/>
<RowDefinition/>
<RowDefinition/>
</Grid.RowDefinitions>
<Grid.ColumnDefinitions>
<ColumnDefinition />
</Grid.ColumnDefinitions>
<TextBlock Grid.Row="0" Grid.Column="0" Text="Duty Name:"/>
<TextBlock Grid.Row="0" Grid.Column="1" Text="{Binding Path=DutyName}" />
<TextBlock Grid.Row="1" Grid.Column="0" Text="DutyType:"/>
<TextBlock Grid.Row="1" Grid.Column="1" Text="{Binding Path=DutyType}"/>
<Separator Grid.Row="2" Grid.ColumnSpan="2"/>
</Grid>
</Border>
</DataTemplate>
<LinearGradientBrush x:Key="GrayBlueGradientBrush" StartPoint="0,0" EndPoint="1,1">
<GradientStop Color="Yellow" Offset="0" />
<GradientStop Color="Green" Offset="0.5" />
<GradientStop Color="Yellow" Offset="1" />
</LinearGradientBrush>
<Style TargetType="{x:Type Button}">
<Setter Property="Background" Value="{StaticResource GrayBlueGradientBrush}" />
<Setter Property="Width" Value="80" />
<Setter Property="Margin" Value="10" />
</Style>
</Window.Resources>
<StackPanel>
<Button x:Name="Add" Click="OpenNewWindow">직무 추가</Button>
<TextBlock Margin="10,0,0,0">직무타입을 선택 하세요.</TextBlock>
<ListBox Name="myListBox1" SelectionChanged="OnSelected"
SelectedIndex="0" Margin="10,0,10,0" >
<ListBoxItem>Inner</ListBoxItem>
<ListBoxItem>OutSide</ListBoxItem>
</ListBox>
<TextBlock Margin="10,10,0,-10">직무</TextBlock>
<ListBox Width="400" Margin="10" Name="myListBox2"
HorizontalContentAlignment="Stretch"
ItemsSource="{Binding}"
ItemTemplate="{StaticResource MyTemplate}"
SelectionChanged="OnSelected2"/>
</StackPanel>
</Window>
[MainWindow.xaml.cs]
using System.Linq;
using System.Windows;
using System.Windows.Controls;
namespace WpfApp1
{
public partial class MainWindow : Window
{
internal static Duties duties = new Duties();
public MainWindow()
{
InitializeComponent();
}
// 상단 ListBox의 항목(직무타입)을 선택했을 때
private void OnSelected(object sender, SelectionChangedEventArgs e)
{
if ((sender as ListBox).SelectedItem != null)
{
string dutyType = ((sender as ListBox).SelectedItem as ListBoxItem).Content.ToString();
DataContext = from duty in duties
where duty.DutyType.ToString() == dutyType
select duty;
}
}
//하단 ListBox의 항목(직무)를 선택했을 때
private void OnSelected2(object sender, SelectionChangedEventArgs e)
{
var duty = (Duty)myListBox2.SelectedItem;
string value = duty == null ? "No selection" : duty.ToString();
MessageBox.Show(duty.DutyName + "::" + duty.DutyType, "선택한 직무" );
}
// 직무추가 버튼을 클릭 했을 때 새창을 띄움.
private void OpenNewWindow(object sender, RoutedEventArgs e)
{
SubWindow subWindow = new SubWindow();
RefreshListEvent += new RefreshList(RefreshListBox); // event initialization
subWindow.UpdateActor = RefreshListEvent; // assigning event to the Delegate
subWindow.Show();
}
// 아래쪽 ListBox를 Refresh 하기위한 델리게이트 및 이벤트
public delegate void RefreshList(DutyType dutyType);
public event RefreshList RefreshListEvent;
// RefreshListEvent 이벤트가 발생했 을 때 호출되는 메소드
private void RefreshListBox(DutyType dutyType)
{
// 내근은 SelectedIndex를 0, 외근은 SelectedIndex를 1로 설정하여
// 상단 ListBox의 선택값을 변경 시킨다.
// 상단 ListBox의 값이 바뀜에 따라 OnSelected 이벤트 핸들러가 호출되어
// 자동으로 아래쪽 ListBox의 값은 변경된다.
myListBox1.SelectedItem = null;
myListBox1.SelectedIndex = (dutyType == DutyType.Inner)? 0 : 1;
}
}
}
[SubWindow.xaml]
<Window x:Class="WpfApp1.SubWindow"
xmlns="http://schemas.microsoft.com/winfx/2006/xaml/presentation"
xmlns:x="http://schemas.microsoft.com/winfx/2006/xaml"
xmlns:d="http://schemas.microsoft.com/expression/blend/2008"
xmlns:mc="http://schemas.openxmlformats.org/markup-compatibility/2006"
xmlns:local="clr-namespace:WpfApp1"
mc:Ignorable="d"
Title="SubWindow" Height="230" Width="350">
<Grid Margin="10">
<Grid.ColumnDefinitions>
<ColumnDefinition/>
<ColumnDefinition/>
<ColumnDefinition/>
</Grid.ColumnDefinitions>
<Grid.RowDefinitions>
<RowDefinition Height="40"/>
<RowDefinition />
</Grid.RowDefinitions>
<TextBlock FontSize="20" Grid.ColumnSpan="3" HorizontalAlignment="Center" VerticalAlignment="Center">직무 등록</TextBlock>
<TextBlock Grid.Row="1" Margin="10" VerticalAlignment="Center">직무명</TextBlock>
<TextBox x:Name="txtDutyName" Grid.Row="1" Margin="10" Grid.Column="1" Grid.ColumnSpan="2" VerticalAlignment="Center"/>
<TextBlock Margin="10" Grid.Row="2" VerticalAlignment="Center">직무타입</TextBlock>
<RadioButton x:Name="rdoInner" Grid.Row="2" Grid.Column="1" HorizontalAlignment="Center" VerticalAlignment="Center">내근</RadioButton>
<RadioButton x:Name="rdoOutside" Grid.Row="2" Grid.Column="2" HorizontalAlignment="Center" VerticalAlignment="Center">외근</RadioButton>
<Button Grid.Column="1" Grid.Row="3" Width="100" HorizontalAlignment="Center"
Click="Button_Click" Height="22">저장</Button>
</Grid>
</Window>
[SubWindow.xaml.cs]
using System;
using System.Windows;
namespace WpfApp1
{
public partial class SubWindow : Window
{
// 메인 윈도우의 하단 ListBox를 Refresh하기 위한 델리게이트
// 메인 윈도우에서 직무추가 버튼을 클릭할 때 이벤트를 할당해 준다.
public Delegate UpdateActor;
public SubWindow()
{
InitializeComponent();
}
// 저장 버튼 클릭
private void Button_Click(object sender, RoutedEventArgs e)
{
if (rdoInner.IsChecked == false && rdoOutside.IsChecked == false)
{
MessageBox.Show("내근 또는 외근을 선택하세요.", "항목선택");
return;
}
DutyType dutyType = (rdoInner.IsChecked == true) ? DutyType.Inner : DutyType.OutSide;
MainWindow.duties.Add(
new Duty(txtDutyName.Text,
dutyType
));
UpdateActor.DynamicInvoke(dutyType);
MessageBox.Show("저장OK!", "저장확인");
this.Close();
}
}
}
Delegate vs delegate
1. The delegate keyword is for the compiler to do some magic for you. When you declare a new delegate with a custom signature,
- the compiler creates a new Type for you derived from MulticastDelegate (which in turn derives from Delegate).
- the compiler adds an Invoke method with your custom signature
- similarly the compiler adds BeginInvoke and EndInvoke methods for this new type
So now when you call delObject(args) - the compiler translates that to delObject.Invoke(args)
2. The Delegate base class provides some functionality such as
- CreateDelegate (for obtaining a delegate wrapping a static/instance method)
- DynamicInvoke (to invoke a delegate with a list of arguments - late bound)
- Combine and Remove (for delegate chaining.. chain multiple delegates together e.g. multiple event handler delegates for an event)
The C# compiler forbids you from deriving from Delegate explcitly in your code.. you have to use the delegate keyword.

(C#교육동영상)C# ADO.NET 실습 ODP.NET/ODAC 설치 오라클 함수 호출 실습, C#학원, WPF학원, 닷넷학원, 자바학원

  (C#교육동영상)C# ADO.NET 실습  ODP.NET/ODAC 설치  오라클 함수 호출 실습, C#학원, WPF학원, 닷넷학원, 자바학원 https://www.youtube.com/watch?v=qIPU85yAlzc&list=PLxU-i...