2022년 1월 22일 토요일

C#, 콘솔채팅동영상, Console Chat, 멀티쓰레드 클라이언트,서버, TcpClient, TcpListener, C#네트워크교육, 시샵학원, C#학원, 닷넷학원, 닷넷교육동영상

 C#, 콘솔채팅동영상, Console Chat, 멀티쓰레드 클라이언트,서버, TcpClient, TcpListener, C#네트워크교육, 시샵학원, C#학원, 닷넷학원, 닷넷교육동영상

http://ojc.asia/bbs/board.php?bo_table=LecCsharpNet&wr_id=55 


C#, 콘솔채팅, Console Chat, 멀티쓰레드 클라이언트,서버, TcpClient, TcpListener, C#네트워크교육

C#, 콘솔채팅, Console Chat, 멀티쓰레드 클라이언트,서버, TcpClient, TcpListener, C#네트워크교육콘솔기반 채팅 프로그램실습콘솔기반의 채팅 프로그램이전 강좌 멀티쓰레드기반 Echo 클라이언트/서버에

ojc.asia

https://www.youtube.com/watch?v=9Hkqgs4o-sc&list=PLxU-iZCqT52CA9Y474h7UbqmWqXwIZ-hl&index=2 

https://www.youtube.com/watch?v=RLiaZaEdyqs&list=PLxU-iZCqT52CA9Y474h7UbqmWqXwIZ-hl&index=1 


콘솔기반 채팅 프로그램


실습


콘솔기반의 채팅 프로그램


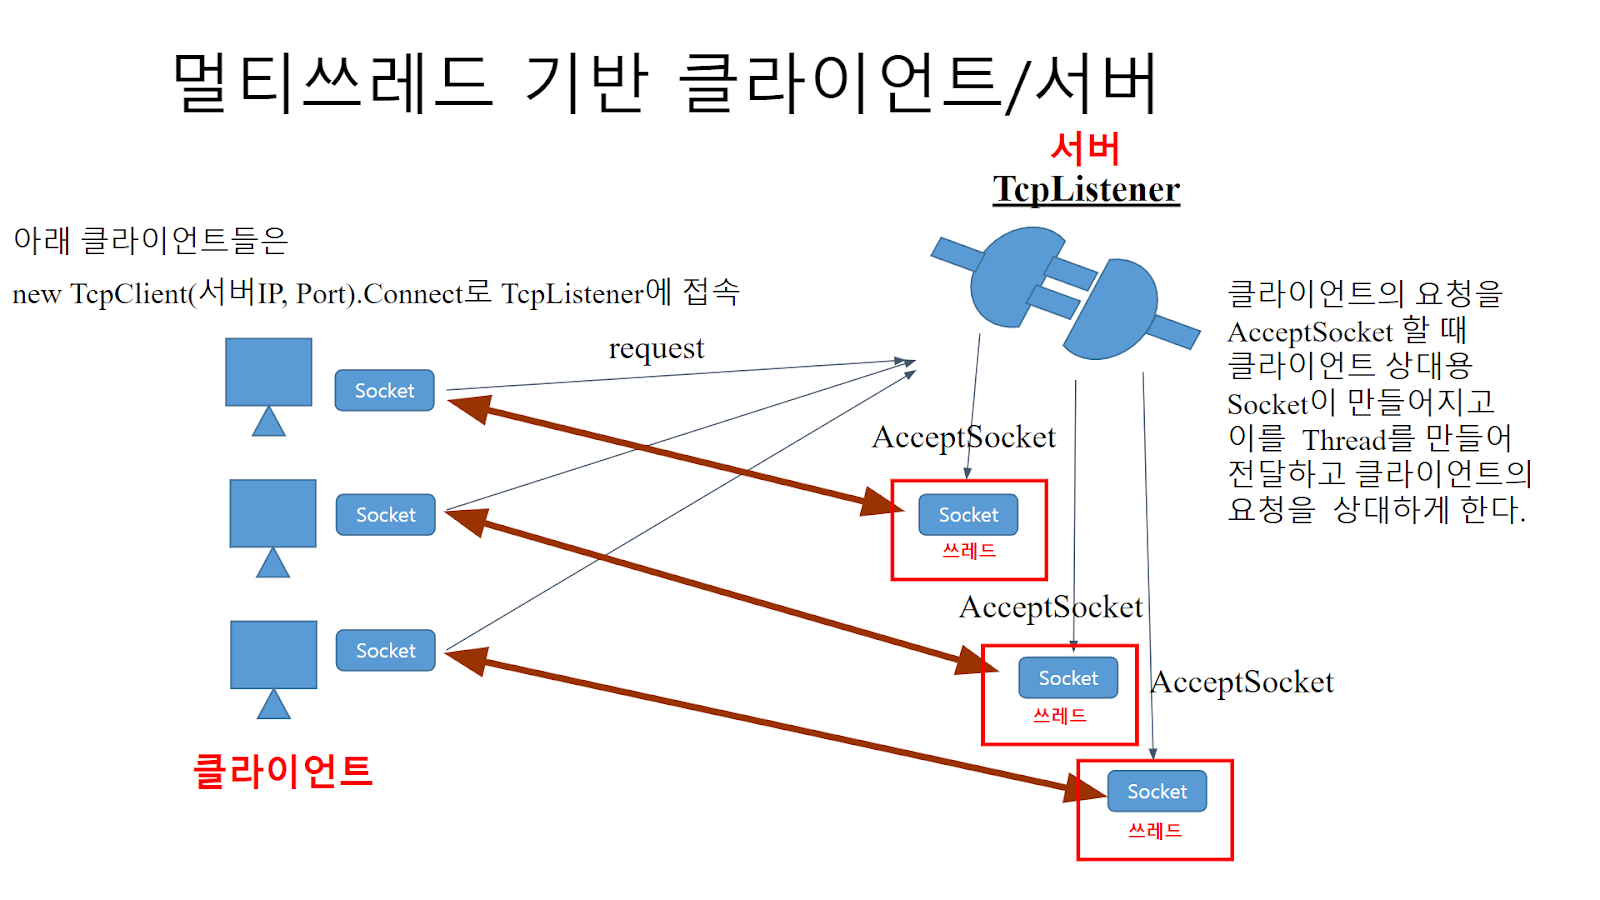
이전 강좌 멀티쓰레드기반 Echo 클라이언트/서버에 아래 기능이 추가되면 된다.


  • 서버 : 클라이언트의 접속을 받는 AcceptSocket() 이후 만들어진 클라이언트 처리용 소켓을 List<Socket> 형태의 ArrayList에 보관한다. 그리도 난 후 글을 쓰는 부분에서 foreach문으로 접속해 있는 모든 클라이언트에 글을 쓸 수 있도록 해야 한다.

  • 클라이언트 : 수시로 서버에서 전송되어 넘어오는 글을 콘솔화면에 쓰기 위해 글 읽는 부분을 쓰레드로 구성해야 한다.


[서버]


[클라이언트]


1. 서버


using System;

using System.IO;

using System.Text;

using System.Net;

using System.Net.Sockets;

using System.Threading;

using System.Collections.Generic;


class ClientHandler

{

    NetworkStream stream = null;    

    StreamReader reader = null;

    StreamWriter writer = null;

    Socket socket = null;


    public ClientHandler(Socket socket)

    {

        this.socket = socket;

        Server.list.Add(socket);

    }


    public void chat()

    {

        stream = new NetworkStream(socket);

        reader = new StreamReader(stream);

        try

        {

            while (true)

            {

                string str = reader.ReadLine();

                Console.WriteLine(str);


                // ArrayList에 보관된 모든 클라이언트 처리 소켓만큼

                // 현재 접속한 모든 클라이언트에게 글을 씀

                foreach (Socket s in Server.list)

                {

                    //클라이언트의 데이터를 읽고, 쓰기 위한 스트림을 만든다. 

                    //자신한테는 글을 되보내지 않는다.

                    if (s != socket)

                    {

                        stream = new NetworkStream(s);

                        writer = new StreamWriter(stream) { AutoFlush = true };

                        writer.WriteLine(str);

                    }

                }

            }

        }

        catch (Exception e)

        {

            Console.WriteLine(e.ToString());

        }

        finally

        {

            Server.list.Remove(socket);

            socket.Close();

            socket = null;

        }

    }

}


class Server

{

    // 클라이언트가 다수 접속하므로 서버가 AcceptSocket 으로 생성한

    // 클라이언트 상대하는 소켓을 ArrayList등에 보관하고 글을 쓸 때

    // 현재 접속한 클라이언트 모두에게 글을 보내야 한다.

    public static List<Socket> list = new List<Socket>();


    public static void Main()

    {

        TcpListener tcpListener = null;

        Socket clientsocket = null;


        try

        {

            //IP주소를 나타내는 객체를 생성,TcpListener를 생성시 인자로 사용할려고 

            IPAddress ipAd = IPAddress.Parse("127.0.0.1");


            //TcpListener Class를 이용하여 클라이언트의 연결을 받아 들인다. 

            tcpListener = new TcpListener(ipAd, 5001);

            tcpListener.Start();


            //Client의 접속이 올때 까지 Block 되는 부분, 대개 이부분을 Thread로 만들어 보내 버린다. 

            //백그라운드 Thread에 처리를 맡긴다. 

            while (true)

            {

                clientsocket = tcpListener.AcceptSocket();


                ClientHandler cHandler = new ClientHandler(clientsocket);

                Thread t = new Thread(new ThreadStart(cHandler.chat));

                t.Start();              

            }            

        }

        catch (Exception e)

        {

            Console.WriteLine(e.ToString());

        }

        finally

        {

            clientsocket.Close();

        }

    }

}


2. 클라이언트


using System;

using System.IO;

using System.Text;

using System.Net;

using System.Net.Sockets;

using System.Threading;


class ServerHandler

{

    StreamReader reader = null;


    public ServerHandler(StreamReader reader) 

    {

        this.reader = reader;

    }


    //서버에서 불특정하게 날아오는 다른 Client가 쓴 내용을

    //받기 위해 클라이언트의 글읽는 부분을 쓰레드로 처리

    public void chat()

    {

        try

        {

            while (true)

            {

                Console.WriteLine(reader.ReadLine());

            }

        }

        catch (Exception e)

        {

            Console.WriteLine(e.ToString());

        }


    }

}


class TcpClientTest

{

    static void Main(string[] args)

    {

        TcpClient client = null;

        try

        {

            //LocalHost에 지정 포트로 TCP Connection을 생성하고 데이터를 송수신 하기 

            //위한 스트림을 얻는다. 

            client = new TcpClient();

            client.Connect("localhost", 5001);


            NetworkStream stream = client.GetStream();

            StreamReader reader = new StreamReader(stream);

            StreamWriter writer = new StreamWriter(stream) 

                                                         { AutoFlush = true };


    //글읽는 부분을 ServerHandler에서 처리하도록 쓰레드로 만든다.

            ServerHandler serverHandler = new ServerHandler(reader);

            Thread t = new Thread(new ThreadStart(serverHandler.chat));

            t.Start();


            string dataToSend = Console.ReadLine();


            while (true)

            {

                writer.WriteLine(dataToSend);  

                if (dataToSend.IndexOf("<EOF>") > -1) break;

                dataToSend = Console.ReadLine();

            }

        }

        catch (Exception ex)

        {

            Console.WriteLine(ex.ToString());

        }

        finally

        {

            client.Close();

            client = null;

        }

    }

}


#시샵채팅, #콘솔채팅, #ConsoleChat, #시샵멀티쓰레드, #TcpClient, #TcpListener, #닷넷채팅, #닷넷교육, #시샵교육, #시샵학원, 시샵채팅, 콘솔채팅, ConsoleChat, 시샵멀티쓰레드, TcpClient, TcpListener, 닷넷채팅, 닷넷교육, 시샵교육, 시샵학원,  

(WPF동영상교육강좌, 동영상실습)데이터 바인딩(Data Binding), WPF Style, 스타일 이란? WPF교육

 (WPF동영상교육강좌, 동영상실습)데이터 바인딩(Data Binding), WPF Style, 스타일 이란? WPF교육


http://ojc.asia/bbs/board.php?bo_table=WPF&wr_id=184 


WPF 데이터 바인딩(Data Binding) 이란?

(WPF동영상)데이터 바인딩(Data Binding) 이란?데이터 바인딩이란 “컨트롤 or 엘리먼트를 데이터에 연결시키는 기술”이다.예문//소스객체 <TextBox Name='txt1' Text='{Binding Mode=OneWay}' />//타겟객체 <TextBox N

ojc.asia


(WPF동영상)데이터 바인딩(Data Binding) 이란?


https://www.youtube.com/watch?v=A0atwgTrcjY&list=PLxU-iZCqT52Cmj47aKB1T-SxI33YL7rYS&index=10 

  • 데이터 바인딩이란 “컨트롤 or 엘리먼트를 데이터에 연결시키는 기술”이다. 
  • 예문

//소스객체

<TextBox Name="txt1" Text="{Binding Mode=OneWay}" />


//타겟객체

<TextBox Name="txt2"  

Text="{Binding Source={x:Reference txt1},Path=Text}"/>

  • 데이터 바인딩은 소스와 타겟이 필요하며 일반적으로 소스는 데이터(ViewModel)이고 타겟은 컨트롤 입니다. 하지만 어느 경우엔 소스와 타겟 둘다 컨트롤이 될수가 있어 구분이 모호할 때도 있습니다. 또 어떤 경우에는 반대로 타겟이 소스에게 데이터를 전달하기도 합니다.
  • 모든 바인딩에는 소스 객체, 소스 속성, 타겟 객체 및 타겟 속성이 있습니다.
  • 타겟 객체는 바인딩 할 속성, 즉 데이터를 렌더링하는 UI 컨트롤을 소유하는 객체이며 소스 객체는 Binding Source속성 또는 ViewModel 클래스인 경우 DataContext 속성으로 지정하면 됩니다.
  • Binding.Source 속성을 통해 지정되는 원본 개체없이 정의 된 바인딩은 대상 개체의 DataContext를 원본으로 사용한다. 
  • DataContext 값은 한 컨트롤에서 다른 컨트롤로 비주얼 트리 아래로 상속되는데, 하위 객체에서 사용가능 합니다.
  • 데이터 바인딩은 이벤트 핸들러를 대체할 수 있는데 이는 C#코드를 줄이는 역할을 합니다. XAML에서 정의된 데이터 바인딩은 C# 코드 비하인드 파일에서 이벤트 핸들러를 정의할 필요가 없으며 코드 비하인드 파일 자체가 필요 없는 경우도 있습니다.
  • 컨트롤은 데이터를 사용자에게 보여주는 것과 사용자가 데이터를 변경할 수 있게 해주는 두 가지 기능을 제공합니다. 최근 컨트롤과 데이터 사이의 많은 반복 작업들이 단순화 되면서 CheckBox를 Boolean 변수로 바인딩하고 사용자가 작업이 끝난 후 Boolean 변수를 다시 CheckBox 값으로 바인딩하는 코드들을 만들어야 했는데 아래처럼 CheckBox와 Bool 변수 사이를 데이터바인딩을 이용하게 간단하게 처리할 수 있습니다.
  • 예문.

[MainWindow.xaml]

<StackPanel Orientation="Vertical" Margin="20" >

        <Label Content="Which city do you love?"/>

        <CheckBox Content="SEOUL" IsChecked="{Binding Seoul}"/>

        <CheckBox Content="JEJOO" IsChecked="{Binding Jejoo}"/>


        <CheckBox Content="INCHEON" IsChecked="{Binding Incheon}"/>

        <Button Content="제출" Click="Sumit_Click"/>

</StackPanel>


[MainWindow.xaml.cs]

public partial class MainWindow : Window

{

//UI 컨트롤에서 바인딩으로 사용할 소스 속성들

public bool Seoul { get; set; }

public bool Jejoo { get; set; }

public bool Incheon { get; set; }


public MainWindow()

{

      this.InitializeComponent();

      //바인딩의 소스객체, UI컨트롤에서 별도의 소스 지정없이 사용가능

      //Window의 하위객체에서 소스 속성으로 사용가능

      this.DataContext = this; 

}


//버튼의 클릭 이벤트 핸들러

private void Sumit_Click(object sender, RoutedEventArgs e)

{

      MessageBox.Show(string.Format("SEOUL: {0}, JEJOO: {1}, INCHEON: {2}", Seoul, Jejoo, Incheon));

}


}


  • 다음은 TextBox간의 단방향 데이터 바인딩 예문을 살펴보자.
  • 아래 예문은 별도의 C#코드는 필요 없다. txt1이 소스 객체가 되고 txt2가 타겟 객체가 되어 소스의 Text 속성의 값을 타겟 txt2의 Text 속성에 바인딩 시킨다.

<StackPanel Orientation="Vertical" Margin="20" >

        <TextBox Name="txt1"  Text="{Binding Mode=OneWay}" />

        <TextBox Name="txt2"  

Text="{Binding Source={x:Reference txt1},Path=Text}"/>

</StackPanel>

위쪽 TextBox에 값을 입력하며 아래쪽 TextBox에 자동 입력된다.

  • 위 코드를 수정하여 양방향바인딩으로 만들어보자.
  • 위쪽 TextBox에서 입력을 하면 아래에 자동 반영 되지만, 아래쪽 TextBox에서 입력을 하면 바로 반영은 안되고 포커스를 잃는경우에만 하는 경우에 상단의 TextBox에 반영된다. (양방향에서 타겟이 소스를 UPDATE하는 타이밍은 UpdateSourceTrigger 속성으로 지정하는데 대부분의 의존 속성 기본값이 PropertyChanged인 반면 Text 속성은 기본값이 LostFocus 입니다.)

<TextBox Name="txt1"  Text="{Binding Path=Text, Mode=TwoWay}" />

        <TextBox Name="txt2"  

Text="{Binding Source={x:Reference txt1},Path=Text}"/>


최종적으로 아래와 같이 UpdateSourceTrigger 절을 타겟객체쪽에 추가하자. 소스를 갱신할 타이밍을 지정하는 곳이고 Text 속성인 경우 기본값은 포커스를 잃을 때(LostFocus)이다.


<TextBox Name="txt1"  Text="{Binding Path=Text, Mode=TwoWay}" />

<TextBox Name="txt2"  

Text="{Binding Source={x:Reference txt1},Path=Text, 

UpdateSourceTrigger =PropertyChanged}"/>

다른 예문을 살펴보자.

public partial class MainWindow {

public MainWindow()

{

  InitializeComponent();


  // create a model object

  _viewmodel = new MyViewModel()

  {

    Date = new DateTime(201171),

    Title = "WPF User Group"

  };


  // bind the Date to the UI

  this.DataContext = _viewmodel;

}

}


<Grid x:Name="LayoutRoot" Background="White">

  ...


  <TextBlock Text="Name:"

              Grid.Row="1"/>

  <TextBox Text="{Binding Path=Title, Mode=TwoWay}"

           Grid.Row="1" Grid.Column="1"/>


  <TextBlock Text="Date:"

              Grid.Row="2"/>

  <sdk:DatePicker SelectedDate="{Binding Path=Date, Mode=TwoWay}"

                  Grid.Row="2" Grid.Column="1"/>

</Grid>


(WPF동영상)WPF Style이란?  Resource, StaticResource 이용 WPF 스타일 적용


WPF Style이란?

로컬 및 윈도우 스타일 적용


WPF Style 이란?

  • WPF XAML의 Resource절은 객체를 참조할 때도 사용되지만 Style 객체를 정의하는데도 이용된다. Style은 Element에 적용되는 스타일 프로퍼티의 집합이다.


  • XAML 안에서 프로그래밍 언어처럼 반복문을 사용할 수 없으므로 동일한 프로퍼티를 가지는 여러 요소들을 생성할 때 사용하면 좋다.


  • 페이지에 버튼이 많다고 가정할 때 Margin, Font 등의 속성은 비슷하게 이용되므로 Resource절 내에 Style로 정의하면 공용으로 사용할 수 있다. 이 방법이 스타일을 사용하는 일반적인 방법이다.


  • 웹페이지에 적용되는 Style과 비교했을 때 WPF의 Style은 다른 프로퍼티의 변화 또는 이벤트로부터 유발되는 프로퍼티의 변화를 제어할 수 있기에 더욱 강력하다.


  • Object를 상속받은 Style은 System.Window에 정의되어 있는데 중요한 프로퍼티는 Setter로 SetterBase 객체(Setter와 EventSetter가 상속받음)의 컬렉션인 SetterBaseCollection 타입의 프로퍼티로 이를 통해 프로퍼티나 이벤트 핸들러를 설정할 수 있다. 


  • Setter는 Style의 컨텐트 프로퍼티(ContentProperty)로 Setter와 EventSetter는 Style 요소의 자식이며 일반적으로 Setter가 더 많이 사용된다. EventSetter는 라우팅된 특정 이벤트의 이벤트핸들러를 설정하는데 사용된다.


  • Setter는 특정 프로퍼티와 값을 연결시키며 프로퍼티 타입(DependencyProperty 타입)과 Value 타입(object 타입) 2개의 프로퍼티가 있다.


<Style…>

<Setter Property=”Control.FontSize” Value=”12”/>

<EventSetter …/>

<Setter Property=”Control.FontSize” Value=”{x:Null}”/>

</Style>


  • 대부분 여러 개의 요소와 컨트롤들이 공유 가능하도록 Style을 Resource절에 사용하고 있으며 Application 객체의 Resource절에서 사용한 Style은 전체 응용프로그램에서 공용으로 사용 가능하다.


  • 스타일을 공유하지 않은 아래 경우를 살펴보자.
<Window x:Class="WpfApp2.MainWindow"
        xmlns="http://schemas.microsoft.com/winfx/2006/xaml/presentation"
        xmlns:x="http://schemas.microsoft.com/winfx/2006/xaml"
        xmlns:d="http://schemas.microsoft.com/expression/blend/2008"
        xmlns:mc="http://schemas.openxmlformats.org/markup-compatibility/2006"
        xmlns:local="clr-namespace:WpfApp2"
        mc:Ignorable="d"
        Title="MainWindow" Height="250" Width="450">
    <Grid Height="175">
        <Grid.RowDefinitions>
            <RowDefinition/>
            <RowDefinition/>
            <RowDefinition/>
        </Grid.RowDefinitions>
        <Button x:Name="button" Content="Button2" HorizontalAlignment="Center" VerticalAlignment="Center" Width="100" Height="30">
            <Button.Style>
                <Style>
                    <Setter Property="Control.FontSize" Value="22" />
                    <Setter Property="Control.Foreground" Value="Red" />
                    <Setter Property="Control.HorizontalAlignment" Value="Center" />
                </Style>
            </Button.Style>
        </Button>
        <TextBlock x:Name="textBlock" HorizontalAlignment="Center" Grid.Row="1" TextWrapping="Wrap" Text="TextBlock" VerticalAlignment="Center" Width="100" Height="30">
            <TextBlock.Style>
                <Style>
                    <Setter Property="Control.FontSize" Value="22" />
                    <Setter Property="Control.Foreground" Value="Red" />
                    <Setter Property="Control.HorizontalAlignment" Value="Center" />
                </Style>
            </TextBlock.Style>
        </TextBlock>
        <Button x:Name="button1" Content="Button2" Grid.Row="2" VerticalAlignment="Center" Width="100" Height="30" >
            <Button.Style>
                <Style>
                    <Setter Property="Control.FontSize" Value="22" />
                    <Setter Property="Control.Foreground" Value="Red" />
                    <Setter Property="Control.HorizontalAlignment" Value="Center" />
                </Style>
            </Button.Style>
        </Button>
    </Grid>
</Window>


  • 아래 예문은 Button과 TextBlock에서 Style을 공유했다.


<Window x:Class="WpfApp2.MainWindow"

        xmlns="http://schemas.microsoft.com/winfx/2006/xaml/presentation"

        xmlns:x="http://schemas.microsoft.com/winfx/2006/xaml"

        xmlns:d="http://schemas.microsoft.com/expression/blend/2008"

        xmlns:mc="http://schemas.openxmlformats.org/markup-compatibility/2006"

        xmlns:local="clr-namespace:WpfApp2"

        mc:Ignorable="d"

        Title="MainWindow" Height="250" Width="450">

    <Window.Resources>

        <Style x:Key="normal">

            <Setter Property="Control.FontSize" Value="22" />

            <Setter Property="Control.Foreground" Value="Red" />

            <Setter Property="Control.HorizontalAlignment" Value="Center" />

        </Style>

    </Window.Resources>

    <Grid Height="175">

        <Grid.RowDefinitions>

            <RowDefinition/>

            <RowDefinition/>

            <RowDefinition/>

        </Grid.RowDefinitions>

        <Button Style="{StaticResource normal}" x:Name="button" Content="Button2" HorizontalAlignment="Center" VerticalAlignment="Center" Width="100" Height="30">

        </Button>

        <TextBlock Style="{StaticResource normal}"  x:Name="textBlock" HorizontalAlignment="Center" Grid.Row="1" TextWrapping="Wrap" Text="TextBlock" VerticalAlignment="Center" Width="100" Height="30">

         </TextBlock>

        <Button Style="{StaticResource normal}"  x:Name="button1" Content="Button2" Grid.Row="2" VerticalAlignment="Center" Width="100" Height="30" >

        </Button>

    </Grid>

</Window>


#WPF동영상, #WPFStyle, #Resource, #StaticResource, #WPF스타일, #WPF교육, #WPF강좌, WPF동영상, WPFStyle, Resource, StaticResource, WPF스타일, WPF교육, WPF강좌,  

#WPF데이터바인딩, #데이터바인딩, #DataBinding, #WPF교육, #WPF강의, #WPF동영상, #WPF학원,WPF데이터바인딩, 데이터바인딩, DataBinding, WPF교육, WPF강의, WPF동영상, WPF학원

(C#교육동영상)C# ADO.NET 실습 ODP.NET/ODAC 설치 오라클 함수 호출 실습, C#학원, WPF학원, 닷넷학원, 자바학원

  (C#교육동영상)C# ADO.NET 실습  ODP.NET/ODAC 설치  오라클 함수 호출 실습, C#학원, WPF학원, 닷넷학원, 자바학원 https://www.youtube.com/watch?v=qIPU85yAlzc&list=PLxU-i...